Build a high-performance, secure ZFS NAS with disk LUKS encryption on Proxmox Odroid H4 (Part 1)
Introduction: Laying the Foundation for Digital Resilience
Welcome to the first hands-on part of our series on building your own private home cloud! In the Series Introduction, I talked about the growing need for data sovereignty and digital resilience in an uncertain world. Now, it’s time to roll up our sleeves and start building the core infrastructure: a high-performance, flexible, and most importantly, secure ZFS NAS build.
Many of us rely on pre-built NAS devices from brands like Synology or QNAP. They offer convenience, sure, but often come with limitations – maybe sluggish performance, restricted customization options, opaque software, or surprisingly high costs for the hardware you get. My own journey started because my trusty old QNAP was showing its age, and I had three perfectly good hard drives I wanted to repurpose. Instead of just buying another black box, I decided to build something better.
The goal? To create a system offering a significant performance boost, complete control over the hardware and software stack, robust data integrity using ZFS, and top-tier data security through disk encryption. This article documents exactly how to build a secure NAS this using an Odroid H4 Ultra board, Proxmox VE as the hypervisor, ZFS for the filesystem, and LUKS for encrypting the entire data disks before ZFS even touches them.
Why Proxmox instead of a dedicated NAS OS like TrueNAS? Versatility! Proxmox is a powerful hypervisor based on Debian Linux, meaning I can run my NAS services and experiment with other virtual machines or containers all on the same box. It turns my NAS into a mini home lab server.
In this detailed guide (Part 1), we’ll cover:
- Choosing the hardware and software.
- Installing Proxmox VE.
- Crucially: Setting up full disk LUKS encryption on our three data drives (with options for manual or automated unlocking).
- Creating a resilient ZFS pool on top of the encrypted layer using those three drives.
Let’s get started on this secure ZFS NAS build!
Choosing the Right Foundation: Hardware and Software
Selecting the right components is key to a successful DIY build. You need enough power for your tasks, the right connectivity, and software that meets your goals for flexibility and security.
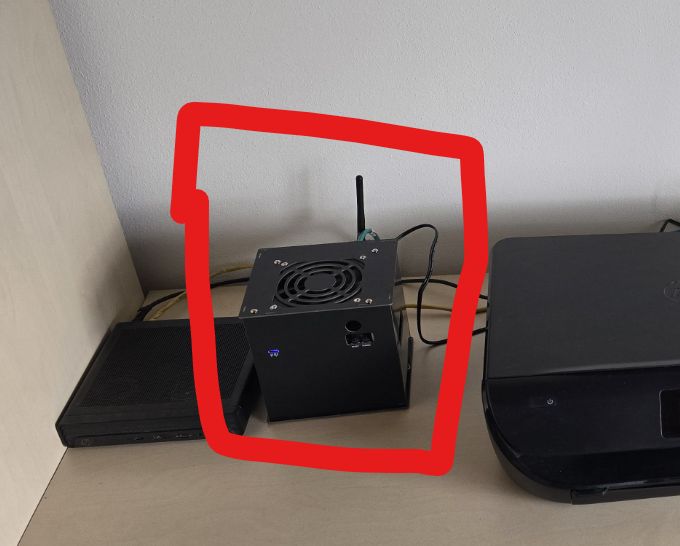
Hardware Spotlight: Why the Odroid H4 Ultra?
After looking at various options, I settled on the Odroid H4 Ultra. It hit a sweet spot for performance, connectivity, and form factor for this specific project. All parts were ordered directly from Hardkernel.
Here’s why it stood out:

- Intel N305 Processor: An 8-core CPU (4 performance, 4 efficiency) offering plenty of horsepower for ZFS operations, file serving, and even running a few light VMs or containers simultaneously.
- DDR5 RAM Support: Allows for faster, more modern RAM, which is beneficial for ZFS (which loves RAM). I went with a single 32GB stick, offering plenty of room.
- 4x SATA Ports: While it has four ports, this project required connecting the three 2.5-inch SATA SSDs I planned to use for the primary data pool. Having an extra port offers future flexibility.
- NVMe Slot: Perfect for a fast boot drive. I used a 256GB NVMe SSD.
- Compact Form Factor & Case Options: Hardkernel offers specific cases designed for the H4 series with drive bays, making it easy to assemble a neat, compact unit.
My Parts List (Ordered from Hardkernel)
- Board: ODROID-H4 ULTRA
- Memory: Crucial 32GB DDR5-5600 SO-DIMM
- OS Storage: NVMe SSD 256GB (repurposed)
- Data Storage: 3 x 1TB SATA SSD 2.5″ (my old disks)
- Power Supply: 19V/7A Power Supply
- Cables: Appropriate SATA Data and Power Cables (e.g., 3x 250mm for this build)
- Case: ODROID-H4 Case Type 3
- Fan: 92x92x15mm DC Cooling Fan w/ PWM, Speed Sensor
You can refer to this link for the case assembly: ODROID-H4+ kit review – Part 1: Unboxing, H4 Type 3 case assembly, and first boot – CNX Software
Software Stack: Proxmox, ZFS, and LUKS
The software choices are just as important as the hardware:
- Proxmox VE (Virtual Environment): Our base operating system and hypervisor. It’s open-source, built on robust Debian Linux, and provides a web interface for managing the host, VMs, and LXC containers. Its flexibility was the deciding factor over more specialized NAS OSes. You can find it at https://www.proxmox.com/en/downloads.
- ZFS (Zettabyte File System): An advanced filesystem renowned for its focus on data integrity. Key features we’ll leverage include:
- Checksumming: Protects against silent data corruption.
- Copy-on-Write (CoW): Ensures filesystem consistency.
- Snapshots: Allows for easy point-in-time backups and rollbacks (we’ll cover this more in Part 7).
- RAID-Z: Provides software RAID capabilities for redundancy. We’ll use
raidz1(single parity) with our three disks, which allows the pool to survive the failure of any one disk.
- LUKS (Linux Unified Key Setup): The standard for full disk encryption in the Linux world. We will use LUKS to encrypt our entire SATA data disks before creating the ZFS pool on top of them.
Critical Decision: Full Disk LUKS vs. ZFS Native Encryption
ZFS does offer its own native dataset-level encryption. So why did I deliberately choose to use LUKS to encrypt the entire disk underneath ZFS? This was a conscious security decision based on a few key factors:
- Protection of Metadata: This is the big one for me. With ZFS dataset encryption, while the contents of your files are encrypted, crucial metadata remains unencrypted. This includes things like filenames, directory structures, file sizes, permissions, and modification times. An attacker with physical access to your drives could potentially learn a lot about your data just by examining this unencrypted metadata, even without being able to read the files themselves. Full disk LUKS encryption encrypts everything below the filesystem layer, including all ZFS metadata, providing a much stronger protection against information leakage if the physical drives are compromised (e.g., stolen).
- Protection Against Cold Boot Attacks: While complex, cold boot attacks aim to extract encryption keys lingering in RAM shortly after a system is powered off. Full disk encryption, especially when combined with a strong passphrase (or a securely handled keyfile) and potentially secure boot mechanisms (though we aren’t delving into secure boot in this guide), generally offers a more robust posture against such attacks compared to file-system level encryption where keys might be managed differently.
- Simplicity for Full Protection: My goal for this NAS was simple: protect all data on the data drives comprehensively. While ZFS encryption offers granular control (encrypting only specific datasets), LUKS provides a straightforward, all-encompassing encryption layer for the entire device in this scenario. It felt like a cleaner, more robust approach for encrypting the entire data volume.
In essence, layering LUKS underneath ZFS gives us the best of both worlds: rock-solid, whole-disk encryption via LUKS, combined with the powerful data integrity and management features of ZFS.
Step 1: Installing the Proxmox VE Hypervisor on the Odroid H4
Alright, the first major step is getting Proxmox VE, our hypervisor foundation, installed onto the speedy NVMe drive. This drive will hold the Proxmox operating system itself, keeping it separate from our bulk data storage (which we’ll set up later). Proxmox VE is essentially a specialized version of Debian Linux, giving us a powerful platform with a great web interface to manage everything.
Here’s my process for getting it onto the Odroid H4 Ultra:
- Quick Hardware Prep (Odroid H4 Specific):
- Before powering anything up, I made sure to connect the small RTC backup battery that came with the Odroid H4. This little battery maintains the BIOS settings and the system clock when the main power is off.
- I also installed the DDR5 SO-DIMM RAM stick into its slot. The H4 boards use single-channel memory, and I opted for a 32GB module.
- Of course, I connected a USB keyboard, USB mouse, and my monitor via HDMI
- Download the Proxmox VE ISO: Same as any Proxmox install – I went to the official Proxmox Downloads page and downloaded the latest stable ISO image.
- Create the Bootable USB Drive: A USB flash drive is definitely the way to go for installation speed. You’ll need one that’s at least 1GB, but 8GB+ is common.
- Tool Choice: I used Etcher for this, as it’s simple, works across platforms, and is recommended by both Proxmox and the Odroid wiki. Rufus (in DD mode!) or
ddare also fine. - I simply selected the downloaded Proxmox ISO in Etcher, chose my USB drive (make sure it’s the correct one, as it will be erased!), and hit “Flash!”.
- Tool Choice: I used Etcher for this, as it’s simple, works across platforms, and is recommended by both Proxmox and the Odroid wiki. Rufus (in DD mode!) or
- Booting the Odroid H4 from USB:
- With the USB drive created, I plugged it into one of the H4’s USB ports.
- Powered on the Odroid H4. To enter the BIOS/UEFI setup, you need to press the DEL key during the initial boot screen.
- Important Odroid H4 Boot Notes:
- First Boot Can Be Slow: The very first time you power on the H4 after installing RAM, the boot process before you even get to the Proxmox installer might seem very slow (potentially up to 2-3 minutes according to the wiki). This is normal! It’s doing initial RAM timing checks. Subsequent boots (as long as the RTC battery stays connected) will be much faster. Don’t panic if it seems stuck initially.
- Boot Order vs. Boot Menu: Inside the BIOS, you can go to the Boot section and permanently change the boot order to put the USB drive first. However, an often easier way, especially for a one-time install, is to use the F7 key. As the Odroid H4 powers on, repeatedly tapping F7 should bring up a boot device selection menu, allowing you to directly choose your USB drive just for this boot.
- Disable Secure Boot: As mentioned before, it’s best to ensure Secure Boot is disabled in the BIOS/UEFI settings for the installation.
- Whether using the F7 menu or changing the boot order, select your USB drive to boot from it.
- Walking Through the Proxmox VE Installer: You should now see the Proxmox VE installer menu.
- Select Install Option: I chose `Install Proxmox VE (Graphical)
-

- The Wizard: The steps are standard Proxmox:
- Agree to the EULA.
- Target Harddisk: Critically important – select your NVMe SSD drive here. My is 256GB NVMe SSD. Confirm this will wipe the NVMe drive.
- Location/Time Zone/Keyboard: Set these according to your region.
- Password/Email: Set a strong
rootpassword (save it securely!) and enter your email for notifications. - Network Configuration: This step is crucial for accessing your server. A static IP is highly recommended so the address doesn’t change. Use settings specific to your home network.
- Example (if your router/gateway is
192.168.1.1): - Hostname (FQDN):
pve-odroid.local(Choose a descriptive name) - IP Address (CIDR):
192.168.1.10/24(Sets IP:192.168.1.10, Netmask:255.255.255.0. Important: Pick an IP that’s unused and outside your router’s DHCP range!) - Gateway:
192.168.1.1(Your router’s IP) - DNS Server:
192.168.1.1(Your router’s IP or a public DNS like1.1.1.1) - Double-check these values carefully! Note: You typically configure only IPv4 or IPv6 during install; the other can be added post-setup.
- Summary: Double-check everything.
- Install: Click
Installand let it run.
- Reboot & Access the Web UI:
- Once the installer finishes, remove the USB drive.
- Click
Rebootor let the system restart automatically. - The Odroid H4 should now boot from the NVMe drive into Proxmox VE. Watch the console output for the web UI address.
Step 2: Initial Proxmox Setup & Essential Tools
With Proxmox installed, let’s perform some initial housekeeping and install the tools we need for encryption and ZFS.
- Access the Proxmox Web UI: From another computer on the same network, open a web browser and navigate to
https://YourProxmoxIP:8006. You’ll likely see a warning about a self-signed certificate – proceed anyway. Log in using the usernamerootand the password you set during installation. - Use the Post-Install Script (Recommended): The Proxmox community provides an excellent post-installation script that simplifies common setup tasks, especially disabling the enterprise repository (which requires a paid subscription) and enabling the no-subscription repository for updates.
- In the Proxmox Web UI, select your node (e.g.,
pve-nas) in the left-hand tree, then click>_ Shellin the top right. -

- This opens a root terminal console.
-

- Paste the following command into the shell and press Enter:
bash -c "$(wget -qLO - https://github.com/community-scripts/ProxmoxVE/raw/main/misc/post-pve-install.sh)"- The script will guide you through several options. I generally recommend answering yes (
y) to:- Disable Enterprise Repo?
- Add or Correct PVE Sources?
- Enable No-Subscription Repo?
- Disable Subscription Nag? (Optional, but cleans up the UI)
- Update Proxmox VE? (Definitely do this!)
- Allow the script to finish and update the system. It might ask you to reboot afterwards. If so, reboot the server using the GUI (
Rebootbutton) or the shell (rebootcommand).
- The script will guide you through several options. I generally recommend answering yes (
- Install Cryptsetup and ZFS Utilities: After rebooting (if necessary), log back into the Proxmox web UI and open the shell again. Install the necessary packages for LUKS and ZFS management:
apt update
apt install -y cryptsetup zfsutils-linux
apt update: Refreshes the package list.apt install -y cryptsetup zfsutils-linux: Installs two key packages:cryptsetup: Provides thecryptsetupcommand-line tool for managing LUKS encrypted volumes (formatting, opening, closing, etc.).zfsutils-linux: Provides the necessary utilities (zpool,zfs) for creating and managing ZFS pools and datasets.
- In the Proxmox Web UI, select your node (e.g.,
Now our system is up-to-date and has the tools needed for the next critical steps.
Step 3: Implementing Full Disk LUKS Encryption
This is where we secure our three data drives. We’ll use LUKS to encrypt each SATA SSD individually. I’ll first show you how to set it up requiring a manual password at boot, and then optionally how to add a keyfile for automatic unlocking.
Identifying Your Data Disks
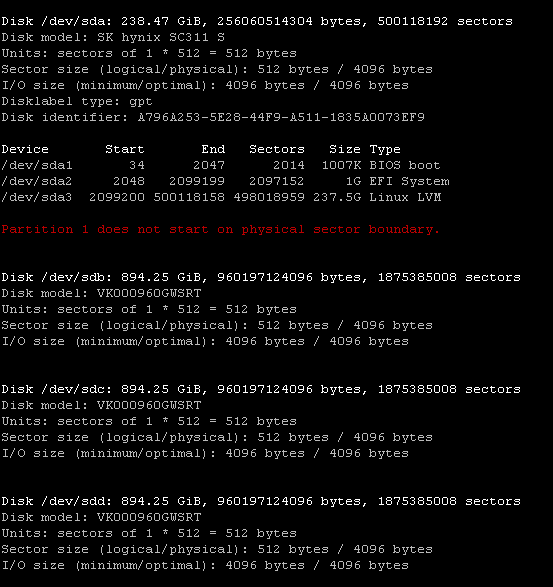
Before encrypting, it’s absolutely crucial to identify the correct device names for your three SATA data drives. Mistakes here can lead to wiping the wrong disk! Use the lsblk command in the Proxmox shell:
fdisk -lLook for your three SATA SSDs (e.g., /dev/sdb, /dev/sdc, /dev/sdd – assuming /dev/sda might be your NVMe). They should be roughly 1TB in size (or whatever size you are using) and should not have any mount points listed initially. Note down these device names carefully. Do not proceed if you are unsure! For the rest of this guide, I’ll assume the data drives are /dev/sdb, /dev/sdc, and /dev/sdd.
Starting Encryption with Password (Manual Unlock Required at Boot)
This is the most straightforward way to encrypt, but it requires you to type the password for each disk every time the server boots up before the ZFS pool can mount.
1. Encrypt the Disks:
For each of your three data disks, run the cryptsetup luksFormat command. You will be prompted to type YES (in uppercase), then enter and confirm a strong password for each disk. Use a strong, unique password and store it securely!
# Disk 1 (e.g., /dev/sdb) - You WILL be prompted for YES and password
cryptsetup luksFormat -c aes-xts-plain64 -s 512 -h sha512 /dev/sdb
# Disk 2 (e.g., /dev/sdc) - You WILL be prompted for YES and password
cryptsetup luksFormat -c aes-xts-plain64 -s 512 -h sha512 /dev/sdc
# Disk 3 (e.g., /dev/sdd) - You WILL be prompted for YES and password
cryptsetup luksFormat -c aes-xts-plain64 -s 512 -h sha512 /dev/sdd
cryptsetup luksFormat: Initializes the LUKS container.-c aes-xts-plain64,-s 512,-h sha512: These specify our strong encryption parameters (AES-XTS cipher, 512-bit key size, SHA512 hash) as discussed before./dev/sdX: The target raw disk device. Replace X with b, c, d respectively.
2. Open the Encrypted Disks (Manually):
After formatting, you need to open (unlock) the LUKS containers to make the decrypted devices available. You will be prompted for the password you just set for each disk.
# Open Disk 1 (e.g., /dev/sdb) - Enter password when prompted
cryptsetup luksOpen /dev/sdb crypt_sdb
# Open Disk 2 (e.g., /dev/sdc) - Enter password when prompted
cryptsetup luksOpen /dev/sdc crypt_sdc
# Open Disk 3 (e.g., /dev/sdd) - Enter password when prompted
cryptsetup luksOpen /dev/sdd crypt_sdd
cryptsetup luksOpen: Unlocks the LUKS container./dev/sdX: The raw disk containing the LUKS container.crypt_sdX: The name given to the decrypted device mapper entry (e.g.,/dev/mapper/crypt_sdb).
Now you have /dev/mapper/crypt_sdb, /dev/mapper/crypt_sdc, and /dev/mapper/crypt_sdd available for use in this session. However, with this manual password method alone, you will need to unlock these devices again after every reboot by typing the password for each one, likely from the recovery console or after logging in.
Typing the password three times can be tedious. To simplify this manual process, you can use the optional script or if you prefer fully automated unlocking where the system boots up and unlocks the drives without requiring any manual password entry or script execution, continue to the optional method below which uses a keyfile (Recommended).
(Optional) Script
This script prompts for the password once and then attempts to unlock all three drives and import the ZFS pool.
Important: This script still requires manual execution after you boot the system and log in as root. It does not fully automate the boot process but makes the manual unlock step quicker.
Helper Script for Manual Unlock (/root/auto_unlock.sh):
#!/bin/bash
# Script to unlock LUKS drives with a single password and import ZFS pool
# Run as root on Proxmox

# --- Configuration ---
# Physical devices to unlock
PHYS_DEVS=("/dev/sdb" "/dev/sdc" "/dev/sdd")
# Names for unlocked devices
MAP_NAMES=("crypt_sdb" "crypt_sdc" "crypt_sdd")
# ZFS pool name to import
ZFS_POOL_NAME="Datastore_ZFS"

echo "--- LUKS Unlock and ZFS Import ---"

# Password prompt
read -s -p "LUKS password for drives (${PHYS_DEVS[*]}): " PASS
echo

# Check if password was entered
if [[ -z "$PASS" ]]; then
    echo "Error: No password entered."
    exit 1
fi

# Unlock devices
SUCCESS=true
for i in "${!PHYS_DEVS[@]}"; do
    DEV="${PHYS_DEVS[$i]}"
    MAP="${MAP_NAMES[$i]}"

    echo "Unlocking: $DEV -> /dev/mapper/$MAP"

    # Check if already unlocked
    if cryptsetup status "/dev/mapper/$MAP" &>/dev/null; then
        echo "Info: $MAP already unlocked."
        continue
    fi

    # Unlock with password
    if echo -n "$PASS" | cryptsetup luksOpen "$DEV" "$MAP" --key-file=-; then
        echo "Success: $DEV unlocked."
    else
        echo "Error: Failed to unlock $DEV."
        SUCCESS=false
    fi
done

# Clear password from memory
unset PASS

echo "------------------------------"

# Import ZFS if all devices were unlocked
if $SUCCESS; then
    echo "Info: All LUKS devices unlocked."
    echo "Info: Checking ZFS pool '$ZFS_POOL_NAME'..."

    # Check if pool is already imported
    if zpool list -H -o name "$ZFS_POOL_NAME" &>/dev/null; then
        echo "Info: ZFS pool '$ZFS_POOL_NAME' already imported."
    else
        echo "Info: Attempting to import pool '$ZFS_POOL_NAME'..."
        if zpool import "$ZFS_POOL_NAME"; then
            echo "Success: ZFS pool '$ZFS_POOL_NAME' imported."
        else
            echo "Error: Failed to import '$ZFS_POOL_NAME'."
            exit 1
        fi
    fi
else
    echo "Error: Cannot proceed with ZFS, LUKS unlock failed."
    exit 1
fi

echo "=============================="
echo "Script completed."
exit 0
How to Use the Script:
- Save the code above to
/root/auto_unlock.shon your Proxmox server. - Make it executable:
chmod +x /root/auto_unlock.sh. - After booting and logging in as root, run:
/root/auto_unlock.sh. - Enter your LUKS password when prompted.
(Optional) Adding a Keyfile for Automated Decryption
If you want the system to unlock the drives automatically at boot (convenient, but ensure your server itself is physically secure), you can add a keyfile to the LUKS setup after completing Method 1.
1. Create the Secure Keyfile:
First, create a file containing a strong random password. This password will be added as an alternative way to unlock the disks.
# Generate a strong random password (64 chars is good)
# Store this password safely elsewhere too!
MY_STRONG_KEYFILE_PASSWORD=$(head /dev/urandom | tr -dc A-Za-z0-9 | head -c 64)

# Write the password to the keyfile
echo -n "${MY_STRONG_KEYFILE_PASSWORD}" > /root/enc.file

# Secure the keyfile permissions (only root can read/write)
chmod 600 /root/enc.file

# Optional: Verify the file content (use with caution)
# cat /root/enc.file- This creates
/root/enc.filewith a strong random password and restricts its permissions, just like in the previous article draft. Storing this keyfile on the Proxmox root filesystem is reasonably secure if the Proxmox installation itself is on an encrypted drive (often the default) or if you accept the risk based on your physical security.
2. Add the Keyfile to LUKS Key Slots:
LUKS allows multiple keys (passwords or keyfiles) to unlock the same volume. We’ll add our new keyfile as an additional key to each encrypted disk. You will be prompted to enter the original manual password (the one you set in Method 1) for each disk to authorize adding the new key.
# Add keyfile to Disk 1 (e.g., /dev/sdb) - Enter ORIGINAL manual password when prompted
cryptsetup luksAddKey /dev/sdb /root/enc.file

# Add keyfile to Disk 2 (e.g., /dev/sdc) - Enter ORIGINAL manual password when prompted
cryptsetup luksAddKey /dev/sdc /root/enc.file

# Add keyfile to Disk 3 (e.g., /dev/sdd) - Enter ORIGINAL manual password when prompted
cryptsetup luksAddKey /dev/sdd /root/enc.file
cryptsetup luksAddKey: Adds a new key/passphrase to an existing LUKS container./dev/sdX: The raw disk device./root/enc.file: The keyfile whose content will be added as a new key.
3. Configure crypttab for Automatic Decryption:
Now, create the /etc/crypttab entries to tell the system to use the keyfile at boot. We use UUIDs for reliability.
# Get UUIDs and append entries to /etc/crypttab
# Important: Use the UUID of the RAW disk (sdb, sdc, sdd), NOT the mapper!
uuid_sdb=$(blkid -s UUID -o value /dev/sdb)
echo "crypt_sdb UUID=$uuid_sdb /root/enc.file luks" >> /etc/crypttab

uuid_sdc=$(blkid -s UUID -o value /dev/sdc)
echo "crypt_sdc UUID=$uuid_sdc /root/enc.file luks" >> /etc/crypttab

uuid_sdd=$(blkid -s UUID -o value /dev/sdd)
echo "crypt_sdd UUID=$uuid_sdd /root/enc.file luks" >> /etc/crypttab

# Ensure the file has secure permissions (though default should be ok)
chmod 600 /etc/crypttab- These commands retrieve the UUIDs of your three raw disks and create the corresponding entries in
/etc/crypttab, pointing to the/root/enc.fileas the key source.
4. Update Initramfs:
Finally, update the initial RAM filesystem to include the crypttab information and ensure cryptsetup is available early in the boot process.
update-initramfs -u -k allNow, after a reboot, the system should automatically find /root/enc.file and use it to unlock /dev/sdb, /dev/sdc, and /dev/sdd, making /dev/mapper/crypt_sdb, /dev/mapper/crypt_sdc, and /dev/mapper/crypt_sdd available without manual intervention. Your original manual password still works as a backup.
Step 4: Building the Resilient ZFS Pool
Whether you chose manual or automated unlocking, you should now have the decrypted devices /dev/mapper/crypt_sdb, /dev/mapper/crypt_sdc, and /dev/mapper/crypt_sdd available. Let’s create our ZFS storage pool on top of them.
Creating the RAID-Z Pool
We’ll create a RAID-Z1 pool using our three encrypted devices.
zpool create -o ashift=12 Datastore_ZFS raidz1 /dev/mapper/crypt_sdb /dev/mapper/crypt_sdc /dev/mapper/crypt_sddzpool create: The command to create a new ZFS pool.-o ashift=12: Sets theashiftproperty to 12 (4KB sectors), crucial for performance on modern drives.Datastore_ZFS: The name for the ZFS pool.raidz1: Specifies RAID-Z1 (single parity). With three disks inraidz1, this gives us the storage capacity equivalent to two disks, with one disk dedicated to parity for redundancy. It’s the minimum number of disks required forraidz1./dev/mapper/crypt_sdX ...: The three decrypted LUKS devices.
This might take a moment. Once done, the ZFS pool is created and mounted.
Essential ZFS Tuning
Let’s apply some common and beneficial ZFS settings:
# Enable LZ4 compression (fast and efficient)
zfs set compression=lz4 Datastore_ZFS

# Disable access time updates (can improve performance)
zfs set atime=off Datastore_ZFS

# Explicitly set the mountpoint (optional, usually defaults to /PoolName)
zfs set mountpoint=/Datastore_ZFS Datastore_ZFS
zfs set compression=lz4 ...: Enables fast LZ4 compression.zfs set atime=off ...: Disables access time updates to reduce writes.zfs set mountpoint=/Datastore_ZFS ...: Ensures the pool mounts directly at/Datastore_ZFS.
Step 5: Creating ZFS Datasets (Datastores)
With the ZFS pool Datastore_ZFS created, we need to structure it to hold our data. Instead of just creating plain directories using mkdir, we’ll leverage a powerful ZFS feature: datasets. Think of these as individual filesystems nested within your main pool, each acting as a dedicated “datastore” for a specific type of data.
Creating datasets offers better management flexibility, allows for per-dataset properties (like quotas or snapshots later on), and is generally the recommended way to organize data within a ZFS pool.
Let’s create datasets for our common categories od data:
# Create ZFS datasets within the main pool
zfs create Datastore_ZFS/Books
zfs create Datastore_ZFS/Pictures
zfs create Datastore_ZFS/Movies
zfs create Datastore_ZFS/Music
zfs create Datastore_ZFS/DatasetName: This command creates a new ZFS dataset. By default, it inherits properties like compression andatimefrom the parent pool (Datastore_ZFS) and is automatically mounted at/Datastore_ZFS/DatasetName(e.g.,/Datastore_ZFS/Books).
You now have properly structured ZFS datasets ready to hold your files, acting as distinct datastores within your pool.
Step 6: Verification – Checking Your Work
Before setting up shares, let’s verify the setup.
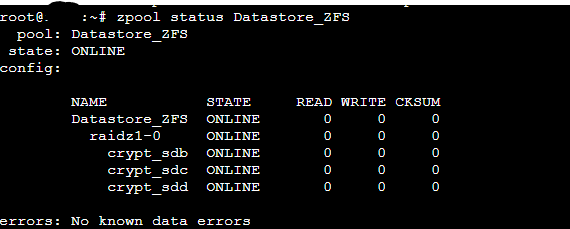
echo "--- ZFS Pool Status ---"
zpool status Datastore_ZFS
echo ""
echo "--- ZFS Filesystem List ---"
zfs list Datastore_ZFS
echo ""
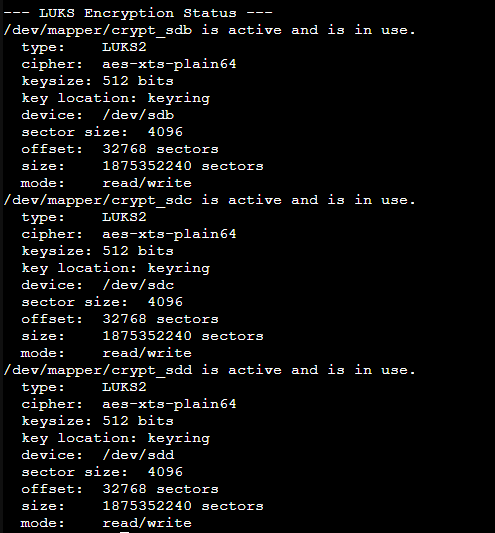
echo "--- LUKS Encryption Status ---"
cryptsetup status /dev/mapper/crypt_sdb
cryptsetup status /dev/mapper/crypt_sdc
cryptsetup status /dev/mapper/crypt_sddzpool status Datastore_ZFS: Check forstate: ONLINEand thatcrypt_sdb,crypt_sdc,crypt_sddare listed andONLINE.zfs list Datastore_ZFS: Check used/available space and mount point.cryptsetup status /dev/mapper/crypt_sdX: Check that each volume isactiveand using the expected cipher (aes-xts-plain64).-
-
- If all commands report healthy states, congratulations! You have successfully created a ZFS pool on top of fully encrypted LUKS volumes.
If you performed the optional keyfile setup (in Step 3) and configured /etc/crypttab, I strongly recommend performing a reboot now. This verifies that the LUKS volumes unlock automatically using the keyfile and that the ZFS pool mounts correctly without manual intervention.
If you only used the manual password method (in Step 3, without setting up the keyfile and crypttab), remember that the LUKS volumes will not unlock automatically during boot. As detailed after Step 3, you will need to log in first, manually unlock the drives (e.g., using the /root/auto_unlock.sh script), and ensure the ZFS pool is imported/mounted before these verification commands will show the correct ONLINE status for the pool and active status for the LUKS volumes. Running the verification commands again after the manual unlock and pool import is essential in that case.
Step 7: Integrating ZFS with Proxmox Storage
Now that we have a healthy, encrypted ZFS pool (Datastore_ZFS), we can make it available directly to Proxmox VE itself. This allows Proxmox to use our resilient ZFS storage for its own purposes, such as storing virtual machine disks, LXC container volumes, ISO images, and backup files (VZDump).
We’ll do this by creating a dedicated ZFS dataset specifically for Proxmox use and then adding it as a “ZFS Storage” entry via the web interface.
1. Create the Proxmox ZFS Dataset:
First, let’s create the dataset. We’ll call it Proxmox nested under our main pool. Open the Proxmox shell (Node -> >_ Shell).
# Create a dedicated dataset for Proxmox storage needs
zfs create Datastore_ZFS/Proxmox
This creates the Datastore_ZFS/Proxmox dataset, which will be automatically mounted at /Datastore_ZFS/Proxmox.
2. Add ZFS Storage in Proxmox UI:
Now, navigate the Proxmox web interface:
- Go to Datacenter view (top-left selection).
- Click on Storage in the left-hand menu.
- Click the Add button.
- Select ZFS from the dropdown menu.
- A dialog box “Add: ZFS” will appear. Fill in the details:
- ID: Enter a unique name for this storage definition within Proxmox. Let’s use
zfs_on_luks(or choose something descriptive likesecure_zfs_storage). Avoid using the exact pool name here to prevent confusion. - ZFS Pool: Select the dataset we just created from the dropdown list. It should appear as
Datastore_ZFS/Proxmox. Ensure you select the correct nested dataset, not the top-level pool. - Content: This is important. Select the types of data Proxmox should be allowed to store here. For general use, you’d typically select:
Disk image(for VM virtual disks)Container(for LXC container volumes)- You might also select
ISO imageandVZDump backup fileif you want to store those here too.
- Nodes: Usually leave as
Allfor a single-node setup, or select the specific node if you have a cluster. - Enable: Ensure this checkbox is ticked.Leave other options (like
Thin provision) at their defaults unless you have specific needs. ZFS handles thin provisioning inherently.
- ID: Enter a unique name for this storage definition within Proxmox. Let’s use
- Click the Add button.
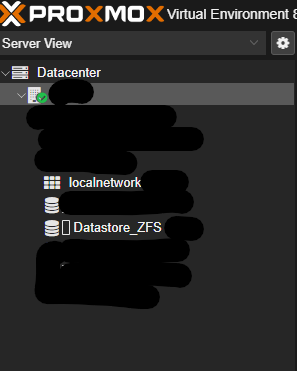
3. Verification:
You should now see your new storage entry (e.g., zfs_on_luks) listed under the Storage view in the Proxmox UI. If you click on it, you should see the Datastore_ZFS/Proxmox dataset listed and the allowed content types you selected.
Proxmox can now leverage your secure, encrypted ZFS pool for its core storage functions! When creating VMs or containers, you’ll be able to select zfs_on_luks (or whatever ID you chose) as the target storage.
Part 1 Completed: The Secure Foundation is Built!
Let’s pause here and appreciate what we’ve accomplished in this foundational first part of our journey to build a private home cloud. This was the most infrastructure-heavy phase, and getting it right is crucial. We’ve successfully:
- Installed the Proxmox VE hypervisor on our chosen hardware, running from the NVMe boot drive.
- Methodically set up LUKS full-disk encryption on all our dedicated data storage drives, configuring them for secure unlocking at boot (primarily manual password, with the optional keyfile automation detailed).
- Created a resilient ZFS pool (
Datastore_ZFS) on the encrypted SDDs, ready to reliably store our bulk data. - Configured Datastore_ZFS on Proxmox specifically prepared for hosting our virtual machines and containers efficiently.
We now have a robust, secure, and layered storage architecture. Our data will be protected by strong encryption at rest, ZFS guards the integrity of our main data pool, and we have distinct storage tiers optimized for different needs. This secure groundwork is essential for building trustworthy services on top.
What’s Next? Bringing the Server to Life with Services!
With the secure foundation firmly in place, Part 2 is where we start adding the capabilities that make this project truly useful day-to-day. We’ll immediately begin deploying our first core services:
- Setting up essential Network File Sharing (SMB & NFS), making that large ZFS data pool easily accessible to all the computers on your home network.
- Installing our first major self-hosted application: the powerful Nextcloud suite, giving you your very own private cloud for files, calendars, contacts, and much more!
Ready to start sharing files across your network and deploy your own cloud drive? The next practical steps are detailed in Part 2 which will be available very soon.To ensure you don’t miss it, I highly recommend subscribing to the site’s RSS feed: Subscribe via RSS

Leave a Reply